Usability: Creating a Template Simulation File
Template simulation files allow you to define a set of physics models and conditions once, and then apply those settings to multiple geometries.
By using dynamic queries in the meshing pipeline, and for region and boundary assignment, you can create a template file that requires little effort to apply in subsequent simulations.
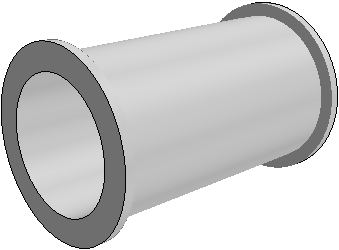
In this tutorial you take a prototype simulation file and export it to a template simulation file. The prototype simulation is for a cold-flow analysis of pipework. You import the solid geometries of the pipework—Simcenter STAR-CCM+ extracts the wetted volume. Although the sample geometry contains only a single pipe section, the resulting template file is suitable for pipework with multiple sections.
A key factor in designing the template is to use mesh operations that can function based on dynamic queries.
This tutorial and the one that follows it only consider the internal volume. The template simulation file is for an internal cold flow simulation only. Therefore there are no interfaces required between the fluid and solid. Also, since a single internal volume is extracted, there are no fluid-fluid interfaces between pipes at the regions level.
The starting file already has the following:
- An initial sample part
- The meshing pipeline defined. The steps in the pipeline are:
- Fill Holes
- Imprint
- Extract Volume
- Automated Mesh
The Fill Holes operation is necessary for closing the ends of the open pipes before applying the Extract Volume operation. The Imprint operation ensures that part contacts are defined for all touching surfaces.
- A region and its boundaries defined
- Physics models selected. The models are typical for an internal cold-flow analysis, and include the Realizable K-Epsilon Two-Layer turbulence model.
- Several scenes
-
Launch
Simcenter STAR-CCM+ and load
QueryTutorial_StartingFile.simfrom the foundationTutorials folder of the downloaded tutorial files. - Save the simulation as QueryTutorial_TemplateFile.sim. The name reflects the fact that you export this simulation to a template file after you finish the initial setup.
-
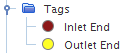
Create two tags for identifying the upstream and downstream faces of the pipework.
Tags allow you to identify almost any object within a simulation. Here, you create tags that are then applied to faces within geometry parts.
- Right-click the node and select New.
- Rename the node, Inlet End.
- Create a second tag and rename it, Outlet End.
-
Apply the tags to the corresponding upstream and downstream faces of the sample part:
- Expand the node.
- Right-click the flange_0 node and select .
- Select the flange_1 node and apply a tag using another method. In the Tags property, select Outlet End from the drop-down list.
-
To identify the end surfaces that guide the
Fill Holes operation, use these same tags in a dynamic query:
-
In the right half of the
End Surfaces property, click the query editor button (
 ).
).
-
To add the first predicate, click
 (Add a new item). Use the controls to set
Tag contains Inlet Endand click (Commit changes).
-
Add a second predicate and set it to
Tag contains Outlet End.Simcenter STAR-CCM+ provides a preview of the objects that are selected by these predicates. As you already applied the Inlet End and Outlet End tags, you can see that the flange_0 and flange_1 parts are selected.
-
In the right half of the
End Surfaces property, click the query editor button (
-
Also for the Fill Holes operation, set the
Input Parts property to select any input part that contains "pipe" in its name:
-
In the right half of the
Input Parts property, click the query editor button ().
-
Add a predicate,
Name contains pipe. - Click OK.
-
In the right half of the
Input Parts property, click the query editor button (
-
To create the filter for internal wetted surfaces:
-
To finish the first entry, or
predicate, click
(Commit changes).
-
To begin the second predicate, click
(Add a new item).
-
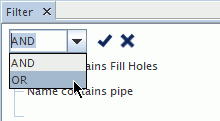
Click the AND operator in the upper left corner of the view. In the drop-down list that appears, change it to
OR.
The first filter is now complete.
-
To finish the first entry, or
predicate, click
-
Now move on to the
Imprint operation. Here, you want to choose all parts that participate in the meshing pipeline, including the result of the
Fill Holes operation.
In this example, the Merge/Imprint Method is set to Discrete Imprint Curves, which is the most suitable method for this case.
-
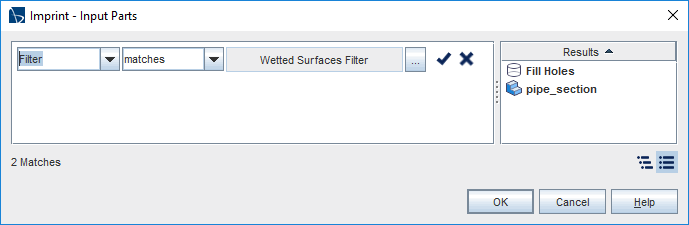
For the
Input Parts property, click the query editor button ().
-
Set the predicate to
Filter matches Wetted Surfaces Filter. Click (Commit changes).
-
For the
Input Parts property, click the query editor button (
- Select the node, and repeat the previous steps.
- Right-click the Operations node and select Execute All.
You now convert the input parts properties for boundaries so that they use dynamic queries for assigning part surfaces.
In order to identify correctly the inlet and outlet surfaces for their respective boundary conditions, you must manually apply tags to the correct surfaces within the Extract Volume part. This part is the result of the Extract Volume operation. When you apply your template to a new geometry, you also repeat this manual step after running the mesh pipeline.
-
Identify the inlet and outlet faces at the geometry level:
- Expand the node.
- Right-click the pipe_section.flange_0 node and select .
- Right-click the pipe_section.flange_1 node and select .
-
Set the fluid inlet and outlet boundaries to use dynamic queries based on the same tags:
- Select the node.
-
In the right half of the
Part Surfaces property, click the query editor button ().
-
Set the predicate to
Tag contains Inlet End. -
Select the
Outlet node and, using the same technique, set the predicate of its dynamic query to
Tag contains Outlet End.
-
To select the remaining surfaces and apply selection priority:
-
In the right half of the
Part Surfaces property, click the query editor button ().
-
Set the predicate to
Relationship below in tree [Parts >] Extract Volume.
-
In the
Part Surface Selection Priority property, click
 (Custom Editor).
-
In the
Boundaries - Part Surface Selection Priority dialog, change the ordering so that
Simcenter STAR-CCM+ applies part surfaces to the
Wetted Wall boundary last:
- Select Wetted Wall (Dynamic) in the list.
- Click
 (Move to Bottom) in the right side of the dialog to move that boundary to the bottom of the list.
Before:
(Move to Bottom) in the right side of the dialog to move that boundary to the bottom of the list.
Before:
After:
- Click OK.
-
In the right half of the
Part Surfaces property, click the query editor button (
-
Finally, remove the sample part and its mesh, and export the final template
file:
- Right-click the node and select Delete. Accept the prompt and continue.
- Select .
- Select . Save the template file as QueryTutorial_TemplateFile.simt.
- Close the simulation. You need not save it since your changes during this exercise are saved in the template file.