Post-Processing: Examining Velocity Vectors
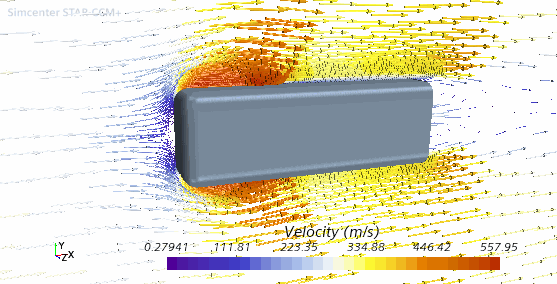
For simulations involving fluid flow, you almost always want to view the flow movement as it passes through the flow domain. Vector scenes are a common technique for viewing flow movement. In this example, using the final simulation file from the Introductory tutorial, you set up vectors in a reflected symmetry plane around a solid-colored blunt body.
To prepare for this tutorial:
-
From the tutorials bundle, within the
introductionfolder, copyIntroduction_final.simto your working directory. Alternatively, work through the Introductory tutorial and start from the final simulation file. -
Open
Introduction_final.sim(or your own version from the Introductory tutorial), and save it asvelocityVectors.sim.
To set up the vector scene:
- Right-click the Scenes node and select .
-
You do not need the outlines that the Outline 1 part
displayer provides by default, so reuse that displayer to show the blunt body as
a solid object.
-
In the Scene/Plot tab, select the node and click
 (Custom
Editor) in the Parts property.
(Custom
Editor) in the Parts property.
-
In the Parts dialog, to remove any
initial selections, click the
 (Select All) button twice.
-
In the Scene/Plot tab, select the node and click
When you create a vector scene, the default setup is for the
Vector 1 displayer to show the
Velocity vector field. Here, you
retain this field, but must make some adjustments to show vectors on the desired
plane.
-
To set up the plane on which vectors are rendered, do the following:
-
Select the node and click (Custom
Editor).
- In the Parts dialog, select the node, then click OK.
- To highlight large differences in velocity effectively, within the Vector 1 node, select Color Bar and set Color Map to purple-red basic (large difference).
- Select the Vector 1 node and set Transform to Symmetry_plane2 1.
These settings show a solid blunt body with velocity vectors surrounding it.
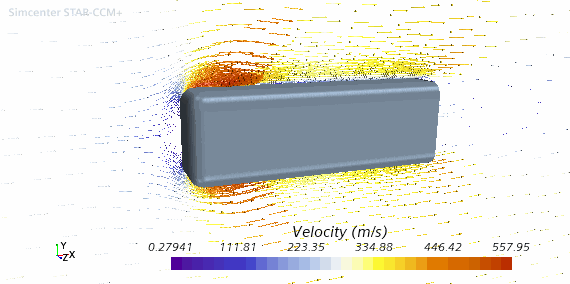
It is possible to make the arrows shorter to see the vectors more clearly.
-
Select the node and click
-
Select the
node and change
Glyph Length (%) to
2.0.
The arrows now appear shorter.
- Save the simulation.