Repairing CAD Geometry
The Geometry Repair tool provides diagnostic checks for assessing the validity of geometry and the means to repair the geometry automatically.
This tool can work at the 3D-CAD level or the parts level, as long as there is CAD data in the geometry part.
The Geometry Repair tool searches for and fixes Parasolid invalidities. These invalidities are errors in the geometry that the Parasolid modeling kernel identifies. The capabilities of the Geometry Repair tool are identical to the capabilities of the Repair Invalid Bodies option available when importing geometry. If the Repair Invalid Bodies option does not fix a particular issue, then the Geometry Repair tool is not able to fix the issue either. While the Repair Invalid Bodies option has a limit to how many errors it can fix, the Geometry Repair tool can fix any number of errors.
The Geometry Repair tool provides you with a user interface and a means to visualize the problem areas on the geometry. Even if this tool cannot repair a particular issue, the tool helps you to identify the problem areas on the geometry. You can then return to the native CAD package and address the identified issues there.
- Launch the tool:
- In 3D-CAD, in the feature tree, right-click the feature that corresponds to the imported geometry and select Repair CAD.
- In Simcenter STAR-CCM+, from the node, right-click the geometry part and select
Repair CAD....
In the Geometry Parts Repair Options dialog, select the appropriate options for your situation and click OK.
In the Geometry Scene window, the individual CAD faces are displayed on the geometry.
- To run the diagnostics check, click
Execute.
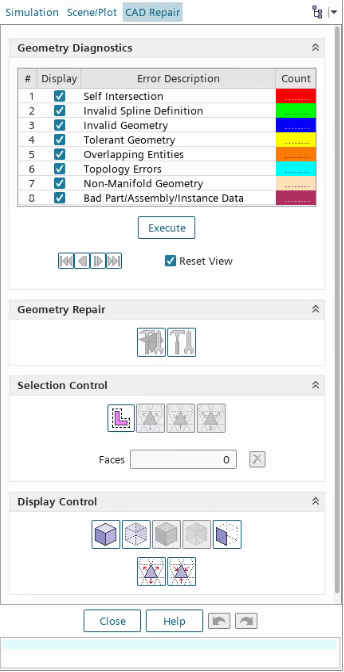
The tool analyzes the geometry for Parasolid invalidities and displays the results in the Geometry Diagnostics panel.
Errors are classified into 8 color-coded categories.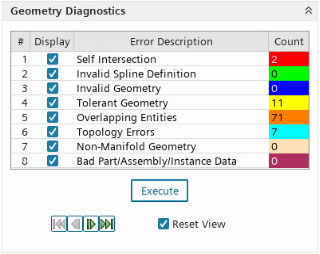
See Geometry Error Categories. The affected areas are highlighted on the geometry in the color that is associated with the type of error. Clicking on the error types in the Geometry Diagnostics panel selects the CAD faces that correspond to that particular error. Edges and vertices are not selected.Note Running diagnostics on large files with many parts is computationally expensive. If you imported the CAD geometry in the parts level, try to limit the diagnostics to smaller groups of parts where possible. You cannot select what specific parts to repair when working in the 3D-CAD level. - Use the
 keys in the
Geometry Diagnostics panel to cycle through the identified problem areas.
keys in the
Geometry Diagnostics panel to cycle through the identified problem areas.
The Geometry Scene zooms into the problem area for each identified error. A short description of the error is provided at the bottom of the Geometry Diagnostics panel. Where appropriate, the location of the issue is displayed in the panel.
- If necessary, modify the selection of the CAD faces and the visualization of these faces using the relevant functions. See Entity Selection.
- Repair the geometry:
- To repair the selected faces
only, click
 (Repair
selected faces).
(Repair
selected faces). - To repair all identified
errors, click
 (Auto-repair geometry errors).
Note If you save the simulation while still in the Geometry Repair tool, the changes that you made so far are saved and the undo/redo functionality is reset. Once you exit the tool and accept the changes, you are no longer able to modify the repair. These actions are irreversible. - To repair the selected faces
only, click
- Click Close.