Using the Table Editor
The table editor combines the functionality of the simulation tree and Properties window.
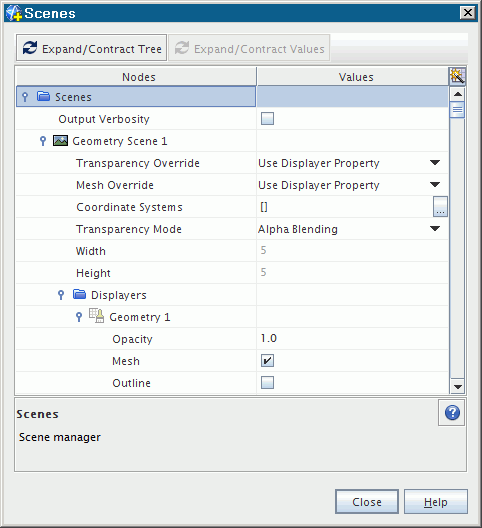
The left-hand column includes nodes and their properties underneath. The right-hand column contains the settings of those properties.

| Note | There is no function available to right-click on a node within the edit dialog. To access pop-up menu options for a node, exit the edit dialog and right-click the appropriate node in the simulation tree. |
Combining the Object Tree and Properties Window
The table editor combines much of the functionality of the object tree and Properties window in a single dialog.
- The description area near the bottom left of the table editor summarizes the currently selected object or property, just like the properties description area does.
- You can access the online Help for objects within the table editor just as you would from the Properties window. When a node has the focus, pressing the question mark button in the lower right corner of the table has the same effect as the <F1> key.
- As with the object tree, Properties window and toolbars, hovering with the mouse activates a brief description of the item of interest.
Activating the Table Editor
The table editor can be activated from several places in the workspace.
- Right-clicking on a node in the simulation tree and selecting
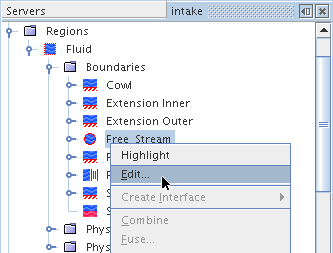
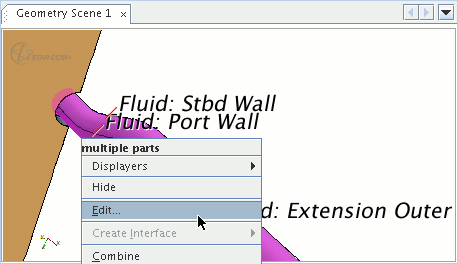
- Right-clicking on an object in the
Graphics window while in interact mode, and selecting one of the edit options from the pop-up menu

These techniques can also be used to activate the multi-edit mode.
Activating the Table Editor in Multi-Edit Mode
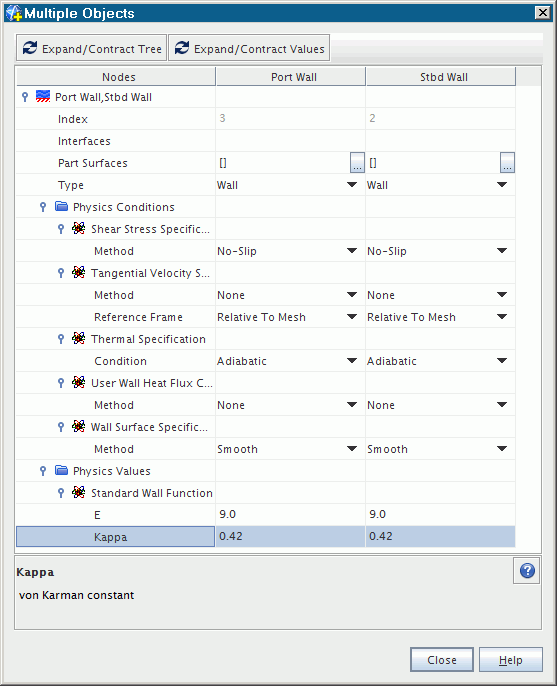
The multi-edit mode of the table editor is a useful way to work with multiple objects at once, provided all of those objects are of the same general type, such as boundaries.
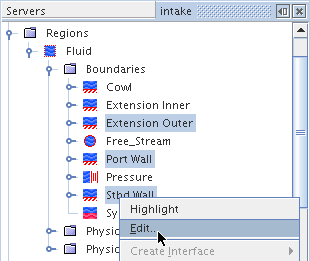
| Note | When you attempt to multi-edit objects with properties that differ extensively, the Edit... context menu item is unavailable (grayed out). This restriction includes the editing of monitors, plots, and scenes. To multi-edit monitors, plots, or scenes, multi-select only the ones of the same type. |
Working with Multiple Objects at a Glance
The table editor lets you apply settings to multiple separate objects easily since you can view them all at once, provided their parent object has the focus when you activate this feature.

This will give you access to the properties of the subnodes. These buttons toggle the rows and columns open and closed.
| Note | There is no function available to right-click on a node within the Multi-edit dialog. To access pop-up menu options for a node, exit the Multi-edit dialog and right-click the appropriate node in the simulation tree. |
Adjusting the Table Editor
You can adjust the table editor for easier access to the objects of interest.
Navigating with the Keyboard
If you prefer using the keyboard, you can use keystrokes to access various parts of the table editor.
For navigating among the cells in the body of the table, the following keys are supported:
- <Right> - shifts the focus from one column to the one right of it. When the focus is in the tree column, pressing this arrow opens the node of the row (assuming it is closed).
- <Ctrl>+<Right> - When the focus is in the tree column, pressing this combination opens all nodes and subnodes within the selected node of the row.
- <Left> - shifts the focus from one column to the one left of it. When the focus is in the tree column, pressing this arrow closes the node of the row (assuming it is open).
- <Ctrl>+<Left> - When the focus is in the tree column, pressing this combination closes all nodes and subnodes within the selected node of the row.
- <Tab> - works like the <Right> arrow.
- <Shift><Tab> - works like the <Left> arrow.
- <Up> - shifts the focus from one row to the one above it.
- <Down> - shifts the focus from one row to the one below it.
- <Home> - shifts the focus to the left cell of the row.
- <End> - shifts the focus to the right cell of the row.
- <Space bar> - goes to edit mode in a property cell.
-
<Esc> - goes to view mode in a property cell, assuming that cell is in edit mode; it does not change the value if you have changed it.
This key closes the dialog if pressed when there is no property cell in edit mode.
To access a drop-down list, navigate with the arrows until the cell of that list has the focus, then press the <Space> bar to display the list. Use the <Up> or <Down> arrow keys to reach the desired item in the list, and then press <Enter>. To exit the list without entering any change, press <Esc>.
To move to the top row of the table body, press <Ctrl>+<Home>. To move to the bottom row, press <Ctrl>+<End>.
To select a contiguous block of nodes, select the first node of the block using the <Up> or <Down> arrow keys, hold down the <Shift> key, then press the <Down> arrow until you reach the last node of the block.
To select a non-contiguous block of nodes, select the first node of the block using the <Up> or <Down> arrow keys, hold down the <Ctrl> key, then press the <Down> arrow until you reach the next node of the block and press the <Space> bar. Continue navigating up or down and pressing <Space> on required nodes until you are done.