Using the Leak Path Tool
The Leak Path Tool identifies leaks in the model. A leak is a gap or a hole that would allow a path to be traced from one volume through to another volume or the outside without crossing through a surface. A fully enclosed surface has no leaks.
This tool displays the shortest path between one source and multiple target faces. The path can be displayed as a segment-based path or as selected faces. This tool is available when you select the Faces filter.
To identify leaks in the model:
-
Click
 (Toggle find leak path mode).
The leak path options are displayed.
(Toggle find leak path mode).
The leak path options are displayed.
-
In the
Graphics window, select a single source face from the displayed surfaces and click
 (Add) within the
Source Face group box.
(Add) within the
Source Face group box.
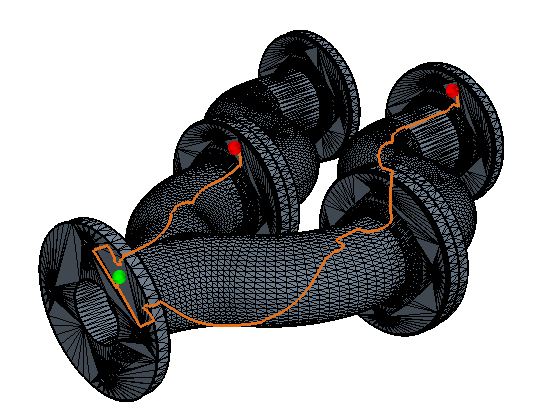
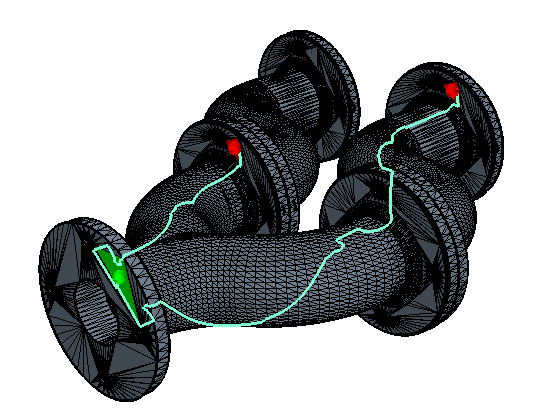
Note You cannot assign contact or interface faces as a source face. The source face is marked in a green color. -
Select one or more target faces from the displayed surfaces in the
Graphics window and click
(Add) within the
Target Face(s) group box.
Note You cannot assign contact or interface faces as target faces. To deselect faces from the Source or Target, select the desired faces in the Graphics window and click (Remove selected faces from the merge set) in the appropriate group box. Similarly, to deselect all faces from the
Source or
Target, click
(Remove selected faces from the merge set) in the appropriate group box. Similarly, to deselect all faces from the
Source or
Target, click
 (Clear all faces from the merge set) in the appropriate group box.
The target faces are marked in a red color.
(Clear all faces from the merge set) in the appropriate group box.
The target faces are marked in a red color.
- Click Find Leak Path to perform leak path detection.
The segment path is generated based on the edge centroid of the leak path faces. A colored sphere is included at the centroid of the source and target faces so that you can still identify these faces when you close the Find Leak Path tool. The color of the leak path is different from the color map that is used for the rest of surface repair to color diagnostics and part surfaces. This different color minimizes color conflicts when viewing the segment path and other coloring options within repair at the same time.
Deactivating the Generate segments for leak path option and recalculating the leak path highlights the faces for the leak path. The face-based leak path is identical to the segment-based path.

The segment-based leak path is always displayed, even if the mesh topology or geometry is changed (for example, as part of a repair operation), or if you close the Find Leak Path tool. To clear the path, click Clear Leak Path.
The Toggle leak path display depth option controls how the segment leak path is displayed relative to the geometry. By default, this option is deactivated, meaning that the path is superimposed on the mesh (no depth control). Activate this option to redraw the path with depth control. Some or all of the path can be hidden from view. It may be easier to visualize the exact path with depth control on, depending on the complexity of the geometry and location of the leak.

If a geometry or topology change is made to the surface mesh, the segment path color changes to orange. This change indicates that the path could potentially be out of date, depending on the change made. Click Find Leak Path to update the path.