Monitoring Pressure
Create three probes that are used to monitor pressure while the solvers are running.
- Right-click the node and select .
- In the simulation tree, right-click the node and select .
-
In the Create Point Probe panel, set the
following properties:
Group Box Setting Input Parts Body 1 Point [0.0101, 0, 1.0E-4] m, m, m Display No Displayer -
Click Create then Close.
A new derived part is created, called .
- Rename the node to Probe-back.
Create two more probes by copying and pasting:
- Copy the entry and paste it into the Derived Parts node.
- Rename the copy to Probe-bottom.
- In the Properties window, set Point to [0,-0.0101,1.0E-4] m, m, m.
- Copy the node for a second time and paste it into the Derived Parts node.
- Rename the copy to Probe-top.
- In the Properties window, set Point to [0,0.0101,1.0E-4] m, m, m.
Display the probes in the Graphics window:
- Multi-select the , , and nodes.
-
Click
 (Make Scene Transparent) and, using the mouse buttons, zoom and position the scene as shown below.
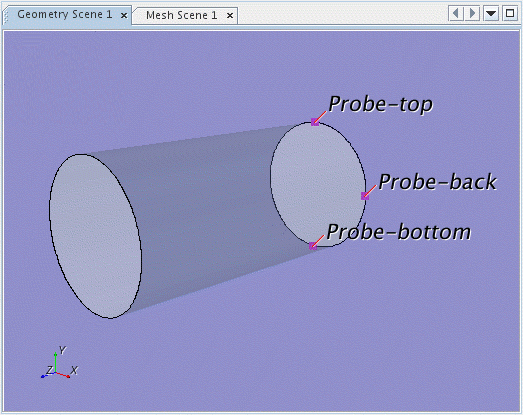
Create three reports, one for each probe:
- Right-click the node and select .
- Rename the node to Max Pressure-back.
-
Select the
node and set the following properties:
Property Value Scalar Field Function Pressure Parts - Copy the node and paste it into the Reports node.
- Rename the copy to Max Pressure-bottom.
- Select the node and set Parts to .
- Create another copy of
- Rename the new node to Max Pressure-top.
- Select the node and set Parts to .
Create a monitor and plot from the reports:
- Multi-select the , , and nodes. Right-click the node and select
- Click Single Plot to display all three values in a single graph.
Simcenter STAR-CCM+ creates three new monitors and the associated plot.
- Rename the node to Pressure Probes Plot.
- Save the simulation.