Importing FMU into Simcenter Flomaster 1D Simulation
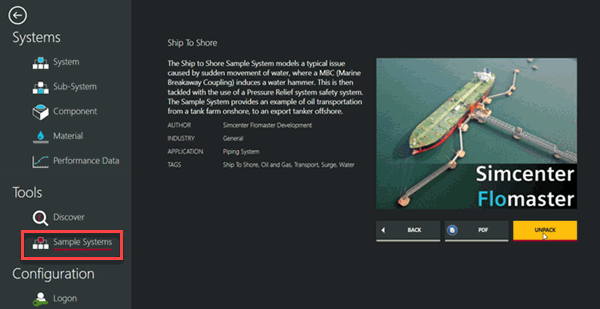
Simcenter Flomaster provides numerous sample systems as pre-defined templates. You start the Flomaster model from the sample system Ship to Shore, which models a typical issue caused by sudden movement of water.
-
To load the sample system, Ship to Shore:
-
Select the system and click UNPACK.
-
In the Networks tab, to open the 1D network,
double-click the icon.
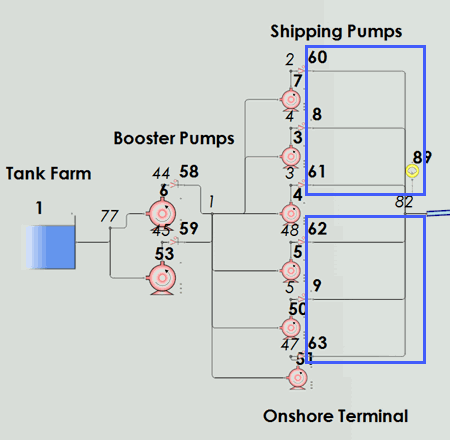
The flows coming from valves 60,8,61 and from valves 62,9,63 are replaced by the FMU component that you exported from Simcenter STAR-CCM+. This FMU represents the four-armed junction.
-
Select the system and click UNPACK.
In the starting files, a pre-defined four-armed junction
component is available in which flow enters through three inlets, merges at a
junction, and leaves through the outlet. In Simcenter Flomaster, because there is no
built-in data for pressure drops in such a component, you import the surrogate model
from Simcenter STAR-CCM+ and configure it
appropriately.
-
To load the pre-defined component,
- Select .
- In the pop-up dialog, select the four_armed_junction_noConnection.FMPck from the starting files and click Open.
- Accept the default settings and click Unpack.
The pre-defined component can be viewed within the Catalogues tab, node.
You import the surrogate model and embed it into the
pre-defined component to create a fully defined four-armed junction.
-
To load the FMU file from Simcenter STAR-CCM+:
-
In the Component Customisation Form, accept
default settings and click OK.

Note Simcenter Flomaster uses SI units. In the case of non-SI units, the variables from the FMU file must be converted in Flomaster using unit converters.
The imported surrogate can be viewed within the Catalogues tab, . -
In the Component Customisation Form, accept
default settings and click OK.
-
To connect the FMU component junction_surrogates into the pre-defined
component:
-
Select the junction_surrogates node and drag it
into the open network.
You can rotate the component clockwise using the
 button from the toolbar.
 -
To set up the mass flow balance, first connect
Inlets
(16,17,18) mass flow to
 Gauge Template controllers
(5,6,7) as Measure Input, selecting Mass
Flow Rate Result feature in the pop-up feature list.
Gauge Template controllers
(5,6,7) as Measure Input, selecting Mass
Flow Rate Result feature in the pop-up feature list.
-
Afterwards, connect the Output Signals of the Gauge
Template controllers(5,6,7) to
the
 3 Arm Sum controller (15)
as Input Signals.
When connecting Inlets (16,17,18) to the FMU component (1), select the corresponding variable.
3 Arm Sum controller (15)
as Input Signals.
When connecting Inlets (16,17,18) to the FMU component (1), select the corresponding variable. -
Connect the Output Signals of Gauge Template
controllers(5,6,7) to the
 FMU component (1) with the
corresponding variable selection:
FMU component (1) with the
corresponding variable selection:
Gauge Template Controller Number FMU Variable 5 Mass Flow 1 6 Mass Flow 2 7 Mass Flow 3 -
To set up pressure in the system, first connect the pressure from
Hydraulic Node
4 to each
 Summing
Junction controller (10,12,14) as
one Input Signal.
The pressure circuit goes from the outlet towards the inlets. When making the connection, select the Hydraulic Node Results: Pressure as the feature.
Summing
Junction controller (10,12,14) as
one Input Signal.
The pressure circuit goes from the outlet towards the inlets. When making the connection, select the Hydraulic Node Results: Pressure as the feature.
The fully connected network of the four armed junction component is shown below: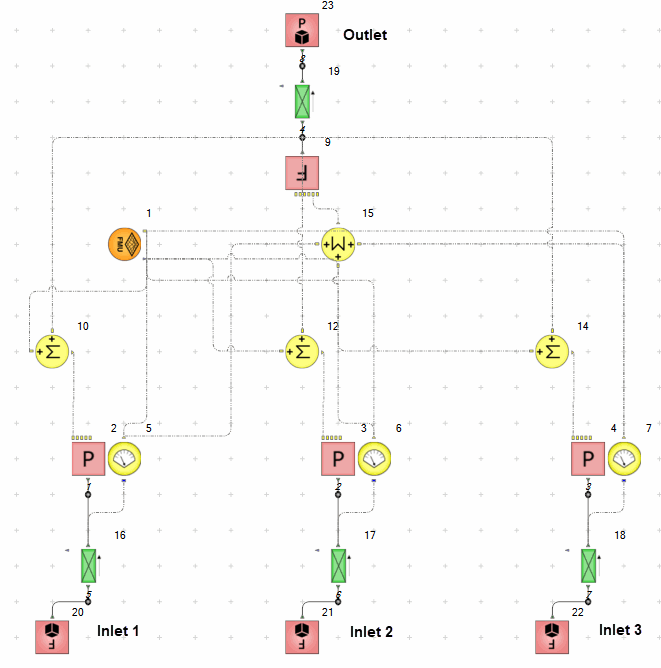
-
Select the junction_surrogates node and drag it
into the open network.
After connecting the four-armed junction in the previous step,
you define the component including the FMU as a new composite component. You can
apply a composite component multiple times in the final network of the ship to shore
system — wherever four-armed junctions are required.
-
To define a new composite component:
-
To arrange the Graphical Port Replacement, select the
Connections tab and click
Graphical View at the bottom.
In the opened window, drag arms 1,2,3 to the left hand side and arm 4 to the right hand side as shown in the image below:

-
To arrange the Graphical Port Replacement, select the
Connections tab and click
Graphical View at the bottom.
-
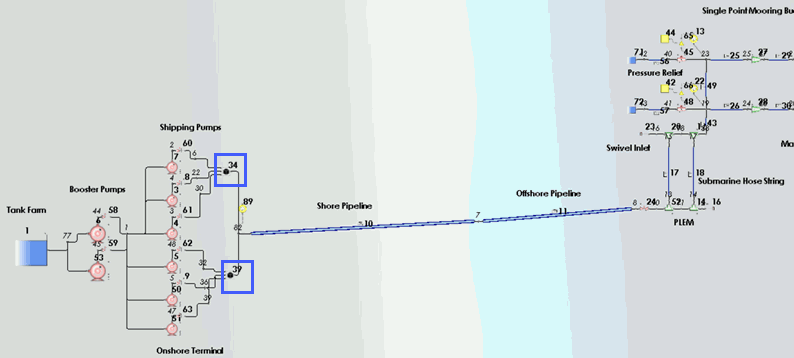
In the network Ship to Shore Model, you place the
four_armed_junction_connected component twice.
- To open the network, in the Networks tab, double-click the Ship to Shore Model to open the network.
- Delete the 6 connections from Valves (60,8,61,62,9,63).
- In the Catalogues tab, select the component and drag and drop it twice in the Ship to Shore Model.
- Connect the Valves (60,8,61) to the first four_armed_junction_connected component (34) without selecting any variables and Hydraulic Node (82) to the 4th port of the component.
- Connect the Valves (62,9,63) to the second four_armed_junction_connected component (39) without selecting any variables and Hydraulic Node (82) to the 4th port of the component.
The new Ship to Shore Model is shown below: