Generating the Volume Mesh
After assigning geometry parts to regions, you can proceed to define and generate the volume mesh using mesh operations. Mesh operations are defined within the node.
Several steps are involved in defining and generating a volume mesh. In this tutorial, you can proceed immediately to define an automated mesh operation and choose the meshers. Other cases can require preliminary operations such as those for transforming parts or modifying them using Boolean operations.
Within the automated mesh operation, you select different meshers for the generation of the surface mesh, the volume mesh, and the prism layers that are created at the wall boundaries of the computational domain. The selected meshers within this automated mesh operation apply to one or more selected geometry parts. You can create several automated mesh operations containing different meshers and mesh settings. Here, you create only one automated mesh operation that applies to one geometry part.
To select the meshers:
-
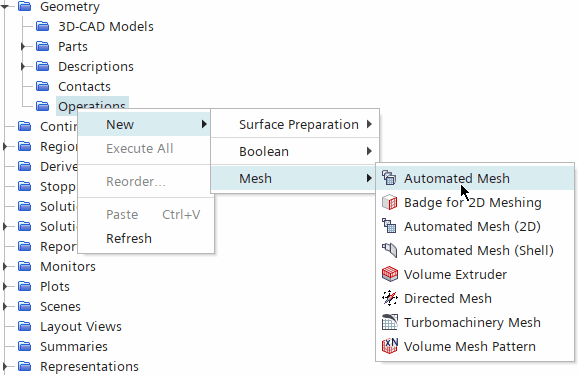
Right-click and select .
-
In the Create Automated Mesh Operation dialog:
-
In the lower part of the dialog, within Select Meshers, select
the following meshers in order:
Group Mesher Surface Meshers Surface Remesher Core Volume Meshers Polyhedral Mesher Optional Boundary Layer Meshers Prism Layer Mesher The final dialog looks as shown below: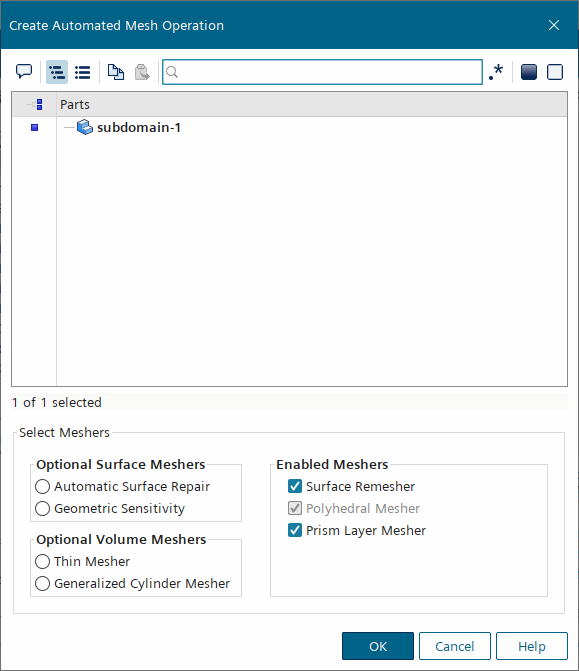
-
In the lower part of the dialog, within Select Meshers, select
the following meshers in order:
-
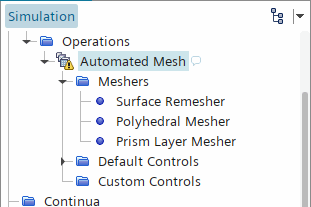
Expand the node.
Generating a mesh often requires several iterations to achieve the desired density and distribution of cells. In this tutorial, to avoid repetition, you specify the global mesh settings and then make some further customizations.
To specify the global mesh settings:
- Within the node, right-click the Default Controls node and select Edit....
-
In the Default Controls dialog, click
Expand/Contract Tree, then set the following properties:
Node Property Setting Base Size Base Size 0.01 m Prism Layer Controls Numbers of Prism Layers 5  Prism Layer Total
Thickness
Prism Layer Total
ThicknessPercentage of Base 20 - After setting the properties, click Close.
With this base size, approximately 8 cells are created across the width of the region.
- By default, the prism layers are generated on the inner and the slip walls by default. However, a fluid boundary layer does not form on slip walls and prism layers are not required. Using a surface control, you can customize the prism mesh settings on that boundary to disable the prism layer generation.
- To provide higher mesh resolution around the blunt body itself, apply a second surface control with a smaller target surface size.
-
To disable the prism layer generation on the slip wall:
-
Set the following properties:
Node Property Setting Surface Control Part Surfaces Slip_wall
Prism Layers Disable
-
Set the following properties:
-
To reduce the mesh size on the blunt body surface:
-
Set the following properties:
Node Property Setting Surface Control 2 Part Surfaces Inner_wall Target Surface Size Custom
Minimum Surface Size Custom
Size Type Absolute Absolute Size 0.001 m
Size Type Absolute Absolute Size 1.0e-4 m
-
Set the following properties:
-
Click
 (Generate Volume Mesh) in the toolbar or select
Generate Volume Mesh in the
Mesh menu.
(Generate Volume Mesh) in the toolbar or select
Generate Volume Mesh in the
Mesh menu.
The run and progress of the meshers are displayed in the Output window.
-
To display the volume mesh, from the Vis toolbar,
click
 (Create/Open Scenes) and select Mesh.
-
In the graphics window, zoom in to see the mesh around the leading corner of the blunt
body.
