Saving and Printing Plot Data
You can export the contents of a plot as data in .csv format. You can also save the plot to an image file or PDF, or send it to a printer.
To export data from one of the curves displayed in a plot, right-click the dataset node corresponding to the data that you wish to export and select Export...
You can export all of a plot’s data at once with the same type of operation by right-clicking on the node of that plot.
This action uses an operating system-specific standard Save dialog, via the save as action, to store the data points of the selected monitor or data set to file. The exported file is written as comma separated values (.csv)--a format supported by many spreadsheets.
The headers of the .csv file contain useful information for each column of data:
- For plot data, the header includes the scalar and the part name:
"PressureRatio-plane section 1" - For monitor data, the header includes the monitor name and scalar:
"Heat Transfer 1 Monitor: Heat Transfer of Boundary Heat Transfer (W)"
Exporting a Plot to an External Viewer File
You can export the contents of a plot to a Viewer (.sce) file from Simcenter STAR-CCM+. To save the plot contents to this format:
- Right-click the plot node or the plot display, and select Export to Viewer File from the pop-up menu.
- In the Save dialog, navigate to the location where you want to save the file, enter the file name in the File Name: text box, and click Save.
- Activate the export feature using either of the following techniques:
- Right-click the Plots node and select Export to Viewer File.
- Multi-select the nodes of the particular plots that you wish to export, and select Export to Viewer File.
- In the Select Objects to Export dialog, the plots that you selected in the object tree can be seen in the left panel. Alternatively, if you activated the dialog by selecting the Plots node, then select the specific plots for export now.
- To control the sequence in which the exported objects appear in the Viewer file, look at the list in the right panel of the dialog. Use the directional arrows to move the items up or down the list as needed.
- Click OK.
Copying a Plot Image to the Clipboard
To copy a plot image to the clipboard, right-click the plot node or in the plot display, and select Hardcopy to Clipboard. Alternatively, select the node (or make the plot display active) and press <Ctrl><Shift><C>.
The image is ready for you to paste into any other program that accepts images from the clipboard.
Saving a Plot Image File
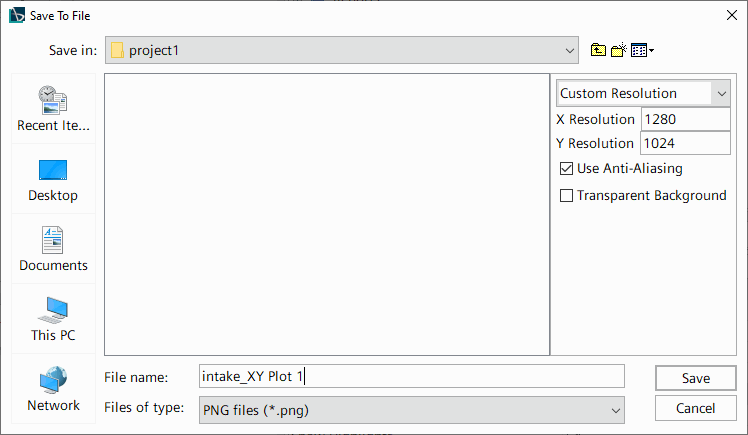
To save a plot image to a file, right-click the plot node, or in the plot display, and select Hardcopy.

To set specific values for the plot image resolution, in pixels, use one of the available options in the drop-down list:
- Locked Aspect Ratio -- enter a value for the X Resolution or Y Resolution, and Simcenter STAR-CCM+ computes the other one to preserve the aspect ratio.
- Custom Resolution -- enter any value up to 4096 for either resolution and the aspect ratio is ignored. This choice can produce unexpected viewports and cutoffs of images.
If you selected an option for the Aspect Ratio property other than Fit Screen, for example 16:9, the drop-down list includes a set of predefined resolution options that are associated with that aspect ratio.

The Use Anti-Aliasing option, when activated, reduces distortion in the rendered image at the expense of higher processing time. This option is recommended for hardcopy output.
To generate an image with a transparent background, activate the Transparent Background option. This option is available for .png files only.
The image file can be written in any of the following formats:
- Portable network graphics (.png)
- Joint Photographic Experts Group (.jpg)
- Portable document format
(.pdf)
Note Annotations within a plot are not exported when the plot is exported to .pdf.
This action is disabled if more than one plot is selected.
Plot images can also be saved in batch mode. The procedure is similar to that for saving scene images in batch.
Printing a Plot Image
To send a plot image to a printer connected to your system, select the plot node, then use the menu item to invoke the print action.