Leak Detection
The surface wrapper leak detection tool is useful for determining whether “leaks” exist in the resultant wrapped surface that is created from an imported surface.
A leak is a gap or a hole that would allow a path to be traced from one volume through to another volume or the outside without crossing through a surface. Therefore, a fully enclosed surface has no leaks.
The leak detection tool can only be used if an import surface representation of some kind exists. The leak is detected in the octree version of the mesh that is built based on the supplied wrapper inputs. However, if a leak is found then the path is displayed using the original import surface representation (not the octree or wrapped mesh). Displaying the leak in this way allows repairs to be made to the surface if necessary to avoid the leak from occurring in the actual wrapped surface.
For information on how to use the leak detection tool, see Closing Gaps and Checking for Leaks.
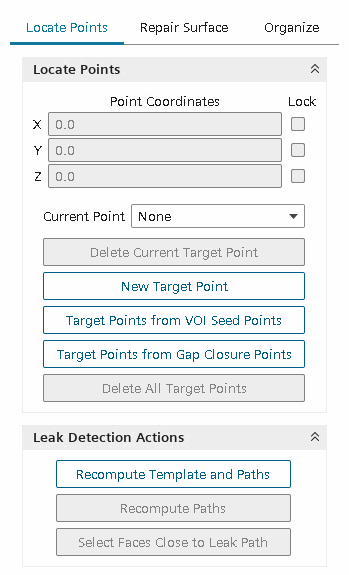
The Leak Detection panel allows you to access three different tools:
- Locate Points — Create and move source and target points for the leak detection calculation
- Repair Surface — Patch up the surface before and after leak detection; Inflate or translate selected faces or edges
- Organize — Create control sets and edit parts. A set is a collection of faces, edges, or vertices, which you can store, recall and browse
- Target Points from VOI Seed Points—creates target points from existing volume of interest seed points.
- Target Points from Gap Closure Points—creates target points from existing gap closure seed points in the surface wrapper.
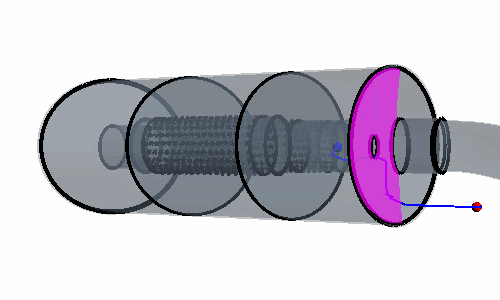
By default, there is a single source and target point. The source point (blue) would typically reside inside the geometry volume while the target point (red) would be anywhere outside (in another volume if necessary).
When running leak detection for the first time on a new geometry, the method builds a template that is based on the supplied input parameters for the surface wrapper. If you run leak detection without activating the Legacy Wrapper (see Legacy Wrapper), the operation generates the octree and performs the leak detection operation in parallel. On execution, the wrapper checks to see if a leak would exist based on the template cell sizes. If a leak is found, then it is traced using a line from the source point to the target point, as shown below:

The results of the leak detection tool can depend on whether the surface wrapper uses the default or legacy wrapper implementation (see Legacy Wrapper).
Where the leak path crosses through the surface indicates the location of the hole which must be fixed. These surfaces can be automatically selected when you select Select Faces Close to Leak Path. An example leak path face selection is shown below:
Being automatically able to select the faces next to the hole aids with the manual surface repair step that follows, as described below. Once a leak path has been detected, you can access the Repair Surface tool by selecting the Repair Surface tab in the Wrapper Leak Detection dialog.
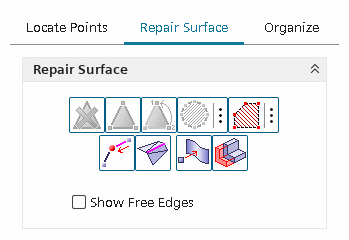
Using this dialog, any holes in the surface can be repaired using the Repair Surface buttons, which are identical in behavior to those in the Surface Repair tool (see Repair Tools Reference). The Show Free Edges toggle can be used to highlight (using green lines) the holes within the geometry. Of particular importance in the Surface Repair options is the Fill polygonal patch button, which can be used to patch arbitrary holes in the surface simply by clicking the surface around the hole. This option does not fill the hole perfectly but covers it sufficiently for the surface wrapper not to detect a hole anymore and produces a uniform surface in its place. The Selection Control, Display Control, and Boundary/Toogle Select Curve options in the dialog can be used the same way as for the normal surface repair dialog.
Note that if you imported the geometry as a part, filling holes at this stage only applies changes to the input surface representation, whereas the geometry part representation remains unchanged. This fact can cause problems if you reinitialize the mesh, as the surface repairs are lost. To ensure that fixes to the surface are permanent, exit the leak detection tool, and use surface repair at the parts level to fix the underlying geometry. This recommendation does not apply if you imported the surface mesh as a region.
To reiterate - the leak detection option is run before the wrapped surface is created (that is, on the original input surface). The leak detection tool accounts for the current wrapper settings and determines if any gaps in the surface would be closed based on the supplied settings. If the sizes specified are not sufficient, it reports back with the leak path through the hole, which must be fixed before progressing. Alternatively, the wrapper settings, in particular the gap closure size, can be modified so that the wrapper can automatically close the hole itself.