Closing Gaps and Checking for Leaks
Identify and close any obvious gaps in the geometry. Run the leak detection tool to identify less obvious gaps and holes.
Two different tools are available to help close holes, namely the polygonal patch filler and the hole filler. The polygonal patch filler is a quick and easy way of closing arbitrary shaped holes which do not have a closed loop definition or are not planar. The process patches over the surface by creating faces that cover the hole area completely. The hole filler is a more exact method of filling well-defined holes by using a closed loop feature edge definition around the hole.
- Open a scene. If you do not have a scene, create one.
-
Right-click and select Run Leak Detection.
Leak detection cannot be launched if the current active scene is contained in a layout.
-
In the Graphics scene, click
 (Allow edges to be selected)
at the bottom of the screen to allow edge selection in the scene.
(Allow edges to be selected)
at the bottom of the screen to allow edge selection in the scene.
-
Patch obvious holes or gaps:
-
If the hole is planar and has edges surrounding it, select the
Repair Surface tab and use the
 (Fill holes using selected
edges) tool. See The Surface Repair
Tool: Filling Holes.
You can double-click an edge to select all other connected edges.
(Fill holes using selected
edges) tool. See The Surface Repair
Tool: Filling Holes.
You can double-click an edge to select all other connected edges. -
If the hole is arbitrary, or is not planar, select the Repair Surface tab and use the
 (Fill Polygonal
Patch) tool. See Repair Tools Reference: Fill Polygonal Patch Tool.
To start creating a patch, click on a surface. To form a closed loop, continue clicking along the surface. To finish, right-click while placing the final point.
(Fill Polygonal
Patch) tool. See Repair Tools Reference: Fill Polygonal Patch Tool.
To start creating a patch, click on a surface. To form a closed loop, continue clicking along the surface. To finish, right-click while placing the final point.
-
If the hole is planar and has edges surrounding it, select the
Repair Surface tab and use the
-
Check the geometry for leaks:
-
Set
Current Point to
Source Point.

-
When you have defined all source and target points, click
Recompute Template and Paths.

If you run leak detection without activating the Legacy Wrapper, the operation generates the octree and performs the leak detection operation in parallel.
If there are no leaks, the Output window reports the following:
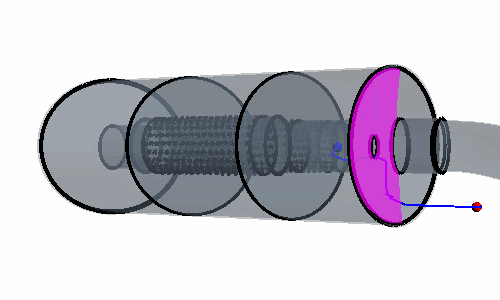
No path found between source and target points.
These points will be on different sides of the final wrapped surface.
If a leak is identified, a path from the source to the target point appears in the Graphics window.

If multiple holes exist in the input surface, then a single target point only detects one of them. The addition of extra target points in different locations around the geometry or in different volumes helps detect holes that the wrapper did not fill. However, it is not guaranteed that adding a target point results in a new hole being found since the point location affects the computed path.Click New Target Point to include extra target points. Each leak path to a different target point is shown in a different color, even if it passes through the same hole. The Delete Current Target Point button can be used to remove a pre-existing target point from the calculation.
Changing the location of any of source or target points, or adding or deleting target points requires the recalculation of the leak path. To recalculate the path, press the Recompute Paths button, which uses the previously defined template as the basis of the calculation.
-
Click
Select Faces Close to Leak Path to highlight the faces that surround the hole.
-
Set
Current Point to
Source Point.
-
Check for any remaining leaks: