Preparing Non-CAD Parts for Directed Meshing
This section provides information on preparing parts with no underlying CAD for directed meshing.
In certain cases you may need to prepare your non-CAD geometry model for use with the directed mesher. There are two methods that you typically use in these instances: separating part surface, and adding seams to cylindrical surfaces.
Separating Part Surfaces
For directed meshing, you are required to separate the model into multiple part surfaces in order to allow for the identification of source and target surfaces. Typically this is done through splitting surfaces by patch, by angle, or another method. You can also identify part surfaces by marking part curves or by explicitly assigning mesh faces to part surfaces in surface repair.
In addition to the simple methods for splitting surfaces, you can exercise greater control using the following two methods to separate the single part surface into distinct source, target, and guide surfaces:
- Manually mark edges and split by part curves:
- Enter Surface Repair and load the part with the single discrete surface.
- Select the edges that separate the surface. You can double-click to select all edges in a chain.

- Click
 (Flag edges as features) to mark the selected edges as features.
- Exit Surface Repair.
- Right-click the part surface and select Split by Part Curves....
- In the dialog that appears, click OK.
The single surface is split into three surfaces.
- Manually add the mesh faces into a new part surface:
- Enter Surface Repair and load the part with the single discrete surface.
- Select all mesh faces that correspond to the top surface.
- Right-click the selection and choose
.

- In the dialog that appears, provide a name for the new part surface and click OK.
- Repeat steps 3 and 4 for the bottom surface.
- Exit Surface Repair.
These part surfaces can then be identified as source and target surfaces in directed meshing.
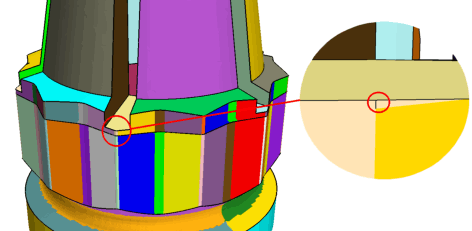
Using a manual approach, you can prepare parts that typically would not be considered appropriate for sweeping, such as a turbomachinery blade. In the following example, you can split each fillet surface into two, with one side used as a source surface and the other side used as a guide surface, with similar splitting used on the target surface side.
| Note | It is worth noting that although the directed mesher may be able to generate a mesh for a given part, it may not be able to generate a 'good' mesh. In the turbomachinery example, with the previously described splitting approach, directed meshing can form elements with a near-180-degree angle along the split line. Some simulation methods are able to handle meshes with these angles, while others may not.
 |
Creating Seams on Cylindrical Guide Surfaces
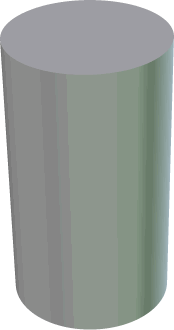
A seam edge connecting the source and target boundary edge loops is required in order for you to be able to mesh the guide surface. Seams are implicitly present on CAD-based cylindrical surfaces. In the absence of implicit seams on the guide surface, for example in the case of the non-CAD cylindrical part from above, Simcenter STAR-CCM+ attempts to create the seams automatically while executing the directed meshing operation.
- The guide surfaces are flat (surface curvatures are zero) or spherical (surface curvature directions are ambiguous)
- The sweep axis is highly convoluted and has many twists
- In a part with a baffle source-target, the generated seam might not start and end at the same vertex on the baffle
A model face on guide surface Surface 2 close to coordinates (-0.944465 -0.314181 0.433333) has more than one loop, which is not supported. This could imply that a model face is missing a model
edge. Introducing a seam edge on the guide surface by feature edge marking in the Repair surface tool might solve the problem.- If there are disconnected cylindrical guide surfaces in a model, such as may be found in pipes or annular cylinders, make sure that each surface has a seam edge. A seam edge can be either a CAD edge, patch boundary, or a marked part curve connecting the source and target. In some cases, such as an s-bend, where you have a more complex guide surface without CAD association, you may require more than one seam edge in order to generate a valid mesh.
- In cases with flat surfaces (see image below), the workaround is
to edit the part manually in the surface repair tool and mark the sharp
edges bounding the flat surfaces as features all the way from source to
target surface.

Preparing Surface Wrapper Output for Directed Meshing
The surface wrapper assigns mesh faces to part surfaces using various geometric criteria (for example angles between mesh faces). In certain cases, the assignment of mesh faces to surfaces is ambiguous. In other cases, the part surface assignment that is ideal for directed meshing may not be ideal according to the geometric criteria used by the wrapper. In such cases, the output of the surface wrapper can have certain artifacts such as superfluous or misplaced part curves or patch boundaries that might hinder the directed meshing operation.